
Create a SwiftUI YouTube Player
Daily Coding Tip 250


Start by going to the YouTube Data API.
If you have an existing project you want to add it to or you want to create a new one, this is possible using the button at the top of the screen next to the search bar. Following that link and clicking Enable will automatically create a project if you don’t have an already existing one anyway, so you only need to do anything if it matters to you.
You will need a Google account for this, and if you’ve enabled it previously you’ll see a Manage button instead of an Enable one. Now you should be able to go to credentials, click the Create Credentials + button, and click API key. This is what you’ll need to access the YouTube Data API, and you will need to paste it into one of the code samples later on.
I’m starting with what is possibly the simplest part of the app. A WKWebView is created inside YTPlayer, which conforms to UIViewRepresentable by providing a way to make and update a UIView subclass hosted inside a SwiftUI view. The URL that I am sending a request to always has the same base URL as a YouTube embed iFrame, as this won’t have the video description, related videos or comment section.
The video ID is what you see in the typical YouTube URL:
https://www.youtube.com/watch?v=dQw4w9WgXcQThe video ID is usually passed as a GET parameter called v, but the equivalent embed URL would use the video ID as a path component like this:
https://www.youtube.com/embed/dQw4w9WgXcQThe embed version of the URL automatically scales to the size of its container, which is useful for YTPlayer which I am not specifying a size for.

The baseURL property is force unwrapped because this app will not function correctly if the video URLs can be nil. After that I am using appendingPathComponent() which always returns a URL that is not nil by properly adding the video ID as a path component.
Now I have a long code sample that just defines structures that are returned by the YouTube Data API. I am keeping things simple here and only including the properties I care about. I’m also making everything optional so that the JSON can hopefully be parsed even if the API changes.
The first thing I’d probably point out is that I had to change the name of the id property in an Item. I changed it so that I could have an id computed property that allowed Item to conform to Identifiable, as this would be useful later when I want to display search results in a List.
I made it easier to get the default thumbnail URL as well, which will save space in my SwiftUI view.

The Snippet is the value that contains the title and description. I’m not using the description, but you might want to display it somewhere. The thumbnails have default, medium and high sizes, but default is a reserved keyword in Swift. This is why you can see the property name has been changed to thumbnailsDefault and the CodingKeys translates the default key.
Now I’m going to create the ViewModel.
I’m using .appending(queryItems: []) on my baseURL here, and I wasn’t even aware this is an iOS 16 exclusive method until now. This is another method that returns a URL that is not nil, and I’m force unwrapping my baseURL to begin with because the app wouldn’t be very useful without it.
You will need to replace YOUR_GOOGLE_API_KEY with the one you created at the start of this tutorial for the app to work.Notice that I have to specify a URLQueryItem with a name of part and a value of snippet. My original implementation of this API listed videos by their videoID, but this wasn’t very helpful in determining which video I wanted to watch.
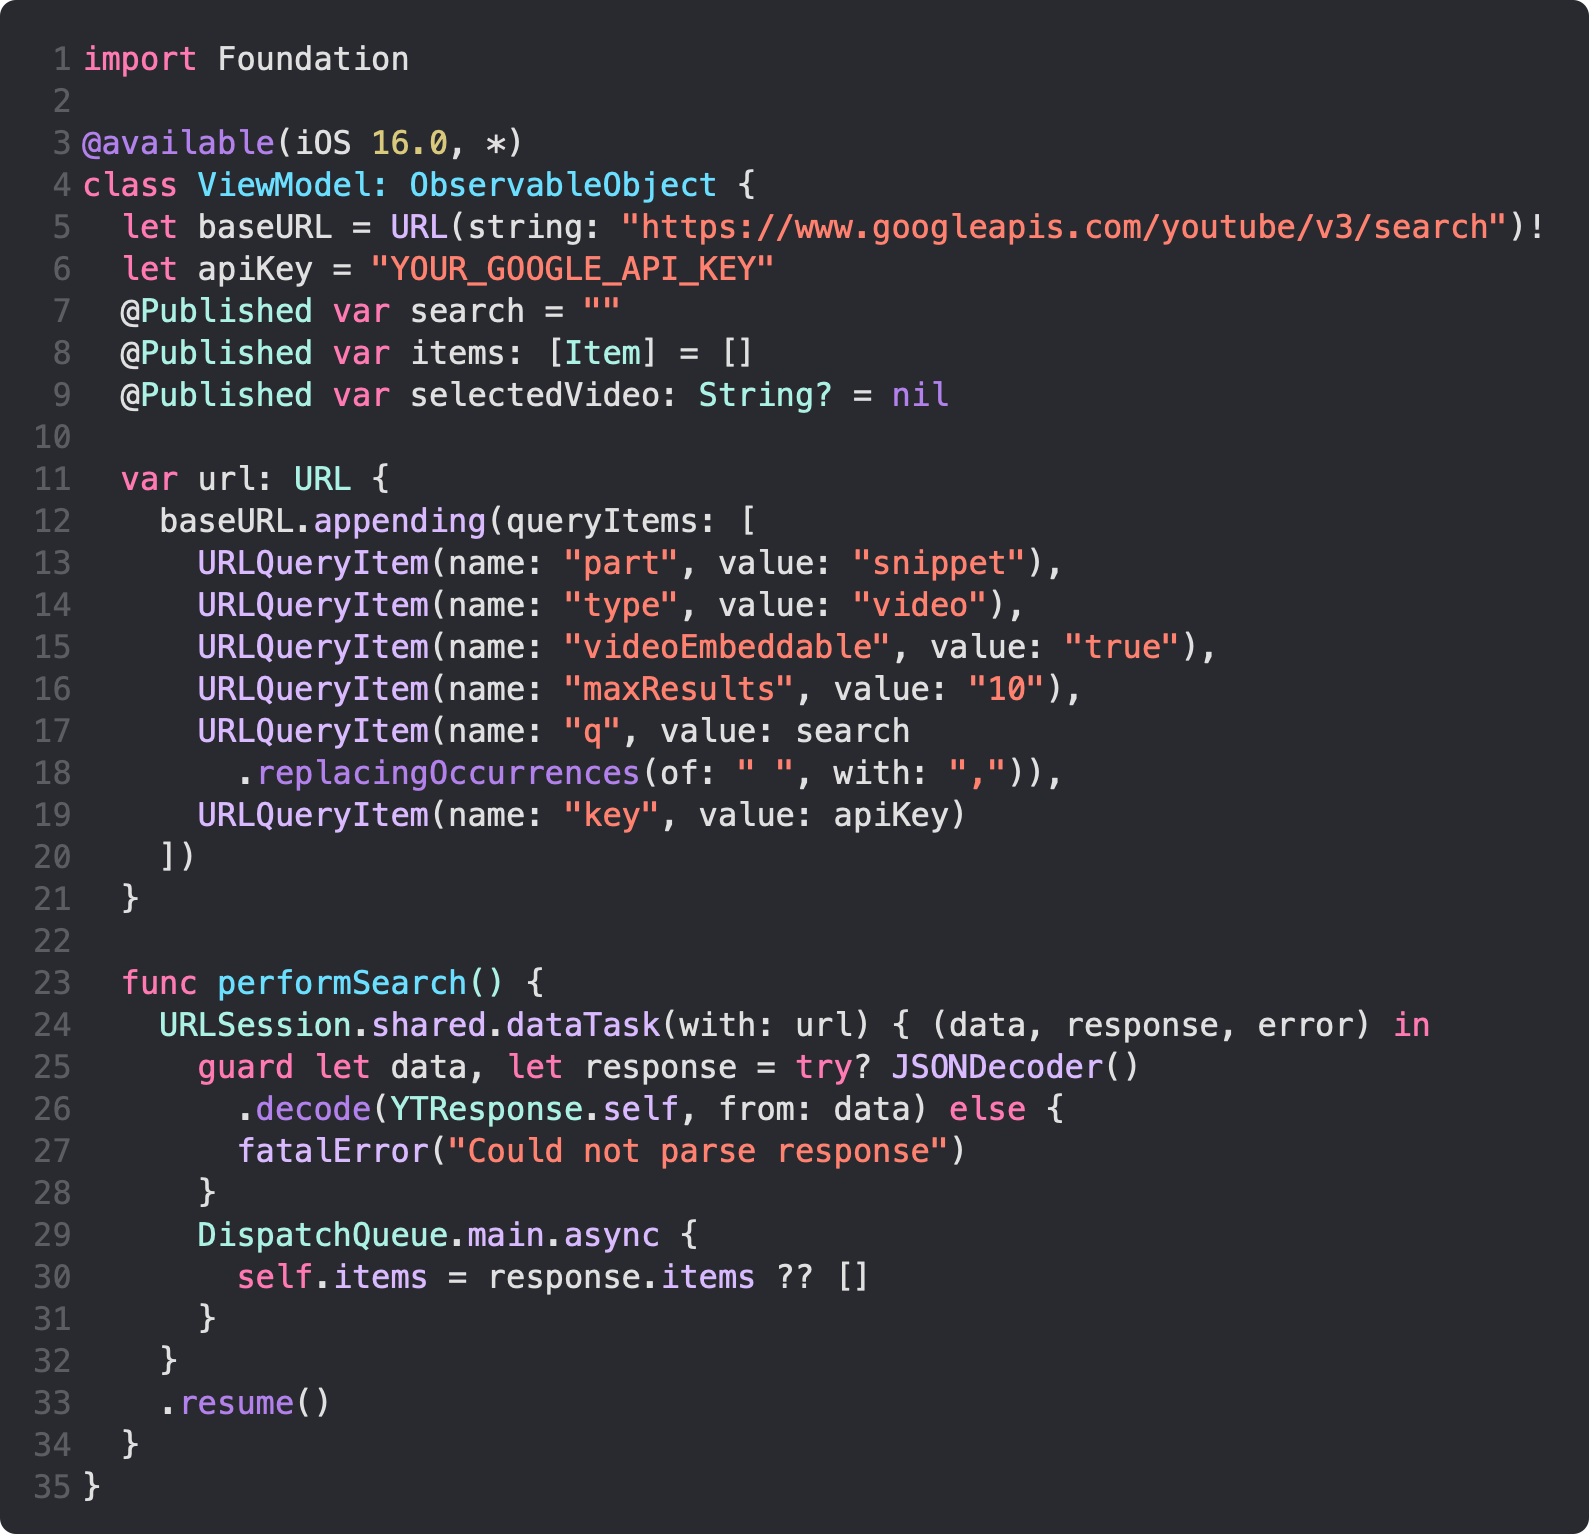
The ViewModel contains the important performSearch function. Instead of using a do and catch I am simply using a guard that stipulates that the response data be parsed successfully, crashing the app with a fatalError otherwise. It is important to update self.items on the main thread, as there will otherwise be a runtime error advising me to do so for SwiftUI view updates.
Now it is finally possible to create the main user interface.
The NavigationStack contains a List displaying the items in the ViewModel. Each item takes the form of a NavigationLink that will pass the videoID when navigating to its destination. Each row of the List is a VStack of the thumbnail for a video on top of its title. I thought this was the easiest way, as titles were frequently long and unsuitable to be in an HStack in an iPhone’s portrait orientation.
The navigationDestination modifier reacts to any NavigationLink that has a String value, which every one in my List does. Since that value is the videoID, a YTPlayer can be created as the destination, appending the videoID as a path component to the YouTube embed baseURL and loading it in a WKWebView.

The aspect ratio for the YTPlayer is specified as 1.3, as this is roughly the 4:3 aspect ratio that YouTube videos were originally. When you tap to play the video it will launch full screen anyway, so the size of the YTPlayer is not particularly important. I did notice that some thumbnails looked oddly stretched when the YTPlayer was allowed to stretch to the size and shape of a portrait iPhone though.
A search bar is added using the .searchable() modifier, but nothing is done until the .onSubmit() modifier adds functionality for when the search is submitted.
The .submitLabel() modifier applies to the software keyboard on an iOS or Simulator device. If you have the software keyboard disabled on a Simulator you can re-enable it with Cmd + K. Otherwise pressing the Return key on your Mac keyboard will perform the same action.